Step-By-Step Stitching Instructions


We’ve pivoted to using the “ties” version, so the mask covers will be more adjustable for users. If you’ve done some with the “around the ears” version - we can and will still use them.X

GENERAL SUPPLIES

  • Printable pattern or a set of four ready cut pieces
  • Fabric shears
  • Paper scissors if cutting patterns
  • Needle nose pliers
  • Pins
  • Thread
  • 1”mm Craft wire or floral wire for the nose channel
  • Cotton Twill Tape Ribbon ( example )
  • Or you make the straps from any fabric you have

IMPORTANT

  • Wash fabric before cutting and sewing
  • Then wash the finished mask cover again to help minimize contamination
  • (Do not use fabric softener or dryer sheets please)
  • Do not allow other people near your workstation or to handle the fabric, again this minimizes possible contamination
  • After you have washed your finished products, place them in a zipper-type storage bag

Stitching guide for mask covers

This is the official guide for how to create a mask cover the way our medical reviewers tell us they want them made. We opted to go with a very verbose picture rich guide in order to help as many volunteers as possible successfully create the mask covers.

We used two different fabrics in order to make the guide easier to follow. You do not need special lining fabric to stitch the mask cover.

The seam allowance for the mask cover is 5/8" of an inch. The only exception is the first curved stich in steps #1 and #2; it has a 1/4 inch seam allowance.

Stitching the lining

Step #1

Step #1st_01
Step #2st_02
Step #3st_03

We are going to make the center line of the face mask cover. Place the two pieces of the lining together with the right sides of the fabric facing each other.

Stitch it along the curve. The seam allowance is 1/4 inch.

Step

Step #2

st_04

Repeat the same process for the front of the mask cover.

Place the two pieces of the front together with the right sides of the fabric facing each other.

Stitch it along the curve. The seam allowance is 1/4 inch.

Step

Step #3 (Informative)

st_05

When done you will end up with the inside and outside lining of the mask cover.

The nose strip

The nose strip needs to be at least 3" long. You may use twill tape, seam binding, or ribbon. Please make sure to use a material that will not fray.

Step

Step #1

st_06

Tip: Before stitching the nose strip, spread the seam apart on the back.

Step

Step #2

st_07

On the other side, place the center of the nose strip against the opened seam.

Don't forget to make sure the nose strip is at least 3" long.

There is no need to insert a wire; we will insert at Covid Rangers HQ before delivery.

Step #3

Step #1st_08
Step #2st_09
Step #3st_10
Step #4st_11

Pin the nose strip to the lining. Try to follow the curve of the fabric as much as possible as it will help the wire fit correctly across the bridge of the nose.

Only stitch the top and the bottom; we need to leave the sides open in order to later be able to insert the wire before delivery.

Finish the edges of pockets

Step

Step #1

st_12

Fold the pocket opening twice, about 1/2 inch for each fold.

This is done in order to prevent fraying and create a needed gap between the pocket and the front part of the mask cover. We need that space in order to create the fold for the straps.

The strap process is described later on.

Step

Step #2

st_13

Stitch the folded up edge in place.

Pin the lining

Step

Step #1

st_14

Line up the lining with the front of the mask cover starting at the nose seam.

Step #2

Step #1st_15
Step #2st_16
Step #3st_17
Step #4st_18

Pin the top first in order to make sure that the nose strip is as aligned as possible. Then go ahead and finish pinning the top and the bottom leaving the sides open for the pocket.

The front fabric should be about an inch or so larger then the lining. We will use that space to create the strap channel later on.

Sew fabric together

Step #1

Step #1st_19
Step #2st_22
Step #3st_21
Step #4st_20

Sew along the top and the bottom in order to connect the front with the lining while creating a pocket in between. Remember to not sew the sides in order to leave an opening for the pocket.

Step

Step #2

st_27

Here is the completed stitching. Cut any off excess thread.

Step

Step #3

st_28

Turn the work right side out.

The top stitch

Step #1

Step #1st_29
Step #2st_30
Step #3st_32
Step #4st_34

Flatten out the seam and pin it down in order to make a good top stitch.

Step

Step #2

st_35

Make a top stitch all the entire length of the the top and bottom.

Do not stitch the side openings!

Step #3

Step #1st_41
Step #2st_42
Step #3st_44
Step #4st_45

Stitch the top of the mask cover making sure you start from the outer edge of the front fabric.

Step #4

Step #1st_36
Step #2st_37
Step #3st_38
Step #4st_39

Stitch the bottom of the mask cover making sure you start from the outer edge of the front fabric.

Making the strap channel

Step #1

Step #1st_46
Step #2st_47
Step #3st_50
Step #4st_51

You need to make two folds. The first fold is a small fold 1/4" in order to prevent fraying. The second one goes all the way to the pocket in order to create space for the strap to go though.

Once pinned stitch along the edge in order to leave space for the strap to move freely.

Create the strap

We will create two 34" straps from herringbone twill tape, insert them through the channels and stitch them in place.

Note that this is different from pervious instructions where we had a single strap. White the medical staff like that approach, it became a problem when the strap woudl get pulled out during washing.

You can also use the following options instead of twill tape.

  1. Use single fold or double fold bias tape. Cut tw 34" inch strips. Stitch along open edge.
  2. Cut two 1 ½” wide x 34” long strips of fabric. Turn in ¼” on each side. Press. Fold in half lengthwise. Forming a ½ “ wide strap. Stitch along length of strap.

Any material that would be comfortable to wear, accept a knot and doesn’t unravel with cleaning/washing would be ok to use.


Step

Step #2

strap_00

Cut two 34" straps from your herringbone twill tape or one of the optional materials.

Step #1

Step #1strap_01
Step #2strap_02

Secure the end with a zig-zag stitch to prevent fraying.


Insert and stitch the strap

Step #1

Step #1strap_03
Step #2strap_04
Step #3strap_05

Attach a safety pin at the end of the strap. Use the rigidity of the safety pin to pull the strap through the channels. Insert one of the straps through the channels on both sides of the mask cover.

Step #2

Step #1strap_07
Step #2strap_06

Pull 13" of the strap through the bottom of the mask cover. This should leave about about 16" on the top side.

The extra length on the top of the mask is by design; some of the wears prefer to tie the straps higgh up on their heads.

Step #3

Step #1strap_08
Step #2strap_09
Step #3strap_10
Step #4strap_11

Add a centerline stitch on each side of the mask cover. Please be careful while handling the mask cover and do not pull on the traps and change the length.

Victory!

Step

Completed Mask

strap_12

Take a victory lap, call your best friend and get a virtual high-five: You have successfully created a mask cover!

Support Covid Rangers

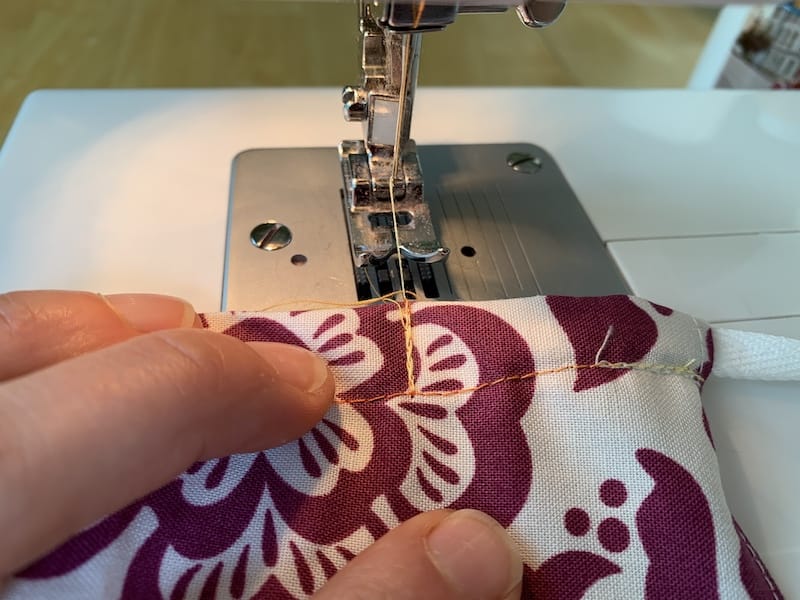
Covid Rangers is a site dedicated to providing guides and information to a large community of volunteers who are sacrificing their time and talent to help fight the Covid-19 pandemic by supporting medical professionals who are in desperate need of basic supplies such as the care mask covers we are creating.


If you want to join the community and support this effort, please join the Facebook group and see how you can help.